Run a Raspberry Pi in standalone “kiosk” mode

A while back, I posted about a Raspberry Pi sound-based sculpture project I collaborated on with my friend Emily Counts. We recently built a follow-up project called Super Mode, which is on display now at Museum of Arts and Design in New York.

Super Mode is physically larger than it’s predecessor, and has a total of 21 buttons. After about a month of being in the gallery, it started having some technical issues due to overheating and SD card corruption. We didn’t have these problems with the previous project because it was installed in a small gallery, and we were able to make sure that the Raspberry Pi got shut down properly each night (using a custom shut down button that was handled in our Python script). Because this new project is installed in a larger gallery, the Raspberry Pi needs to run for longer stretches of time, and it needs to handle being abruptly powered off. It also needs to potentially withstand more heat.

In other words, it needs to run in a true standalone kiosk mode.

I wanted to share what I learned through trial and error as we honed our Raspberry Pi image into something durable enough withstand this tougher environment.

Use Raspbian Lite

Before this project, the only Raspberry Pi OS I had ever used was Raspbian. Raspbian is designed to be an easily-accessible OS, with a GUI (graphical user interface), and a lot of bells and whistles that are only worthwhile when your Pi is connected to a monitor.

But for a Raspberry Pi that’s running all day inside a box in a gallery, Raspbian Lite is a much better OS for the job. Raspbian Lite is a stripped down version of Raspbian. There’s no desktop GUI, so you’ll have to set everything up using the Linux command line. But it’s worth it, and will make a difference to how efficiently your Pi runs.

Download the Raspbian Stretch Lite image and install it on your SD card. Etcher is a free program that makes this process really easy.

Getting things set up

If you’re not used to the Linux command line, even basic tasks can be a little intimidating. I wanted to spell out some things that weren’t obvious to me the first time I up my Raspberry Pi with Raspbian Lite.

Automatically log in

By default, Raspbian Lite will require you to log in using the default Raspberry Pi credentials. When you first start it up, you can log in:

username: pi
password: raspberry

For your Pi to work in kiosk mode, you need your Raspberry Pi to log in automatically after it starts up.

  1. Type in sudo raspi-config to access your Raspberry Pi basic configuration UI.
  2. Using your keyboard’s arrow keys, select Boot Options, then Desktop / CLI, then select Console Autologin

You’ll be asked to reboot. When it does, it should automatically log you in.

Get your Pi on Wi-Fi

If you need to get online (for example, to access your Git repository), you’ll need to set up your Pi’s internet connection. Raspberry Pi model 3 devices have Wi-Fi built in, but you’ll still need to configure it. For a normal home router set up (with a password), it’s pretty simple:

  1. In the terminal, type the following: sudo nano /etc/wpa_supplicant/wpa_supplicant.conf
    This should open an existing configuration file in the text editor Nano. It should already have some text in it.
  2. Arrow to the bottom of the file, and add the following, replacing router-name with your router’s name, and router-password with the password (keep the double quotes):


    network={
      ssid="router-name"
      psk="router-password"
    }

  3. Press Control-X to exit Nano, press Y to save, then press Enter.
  4. Now type sudo reboot

When your Pi reboots, you should be connected to your router. More details and options are here.

Download and install stuff

Now that you’re on Wi-Fi, you can install programs and libraries you need. For me, I only needed two packages that aren’t already in Raspbian Lite: Git (where my code repo lives), and Pygame (my Python script uses Pygame for sound playback).

First, type the following to update apt-get:

sudo apt-get update

Now you can install packages.

sudo apt-get install python-pygame
sudo apt-get install git

Now that I have Git, I can clone my repo. I’ll make sure I’m in the pi directory, add a folder called repos, then clone it there.

cd ~
mkdir repos
cd repos
git clone https://www.github.com/stenobot/SoundMatrixPi

Adjust audio settings

In kiosk mode, you need everything to be configured correctly, including audio settings. This is especially important for my project, as I need to make sure audio is going out of the headphone jack, and not the HDMI port. This can be set up back in raspi-config:

  1. Type in sudo raspi-config to access your Raspberry Pi basic configuration UI.
  2. Using your keyboard’s arrow keys, select Advanced, then Audio, then select Force 3.5mm

This will force audio to always go out of the headphone jack.

Raspbian Lite system volume tends to be pretty low by default, but you can turn it up. The easiest way is to type the following:

amixer set PCM,0 90%

The volume in Raspbian Lite seems to default somewhere around 50% or 60%. Turning it up to 90% or 95% gets the volume to a more reasonable level.

Launch script on startup

If you’re following this tutorial, you will almost certainly need your Pi to automatically run a script when it boots. In my previous post, I recommended using Linux Crontab. This was a mistake, as Crontab will not work when a Raspberry Pi is forced into read-only mode (we’ll cover this in the next step). There are a lot of ways besides Crontab. The one I prefer is to run a shell script after log in is complete. This shell script’s only job is to run my main python script. You can add a line in the .bashrc file to run the shell script.

Make sure your in the pi directory, then create a launcher shell script. I’ll call mine “launcher.sh”:
cd ~
sudo nano launcher.sh

In Nano, have the shell script navigate home, then to the folder where your script lives, the run the script, then navigate back home:

cd /
cd home/pi/repos/SoundMatrixPi
sudo python core.py
cd /

Press Control-X, Y, then Enter to exit Nano and save your new file.

Next, make your script executable:
sudo chmod 755 launcher.sh

Then test the shell script to make sure it works. It should run your python script (mine will run core.py):
sh launcher.sh

Press Control-C to stop the running script.

Next we set .bashrc to launch our shell script for us. Go home, then open .bashrc:
cd~
sudo nano .bashrc

In Nano, arrow down to the very bottom of the .bashrc file, and add this:
./launcher.sh

Press Control-X, Y, then Enter to exit Nano and save the .bashrc file.

Now run sudo reboot. If everything worked, your shell script should run automatically, which will in turn run your python script!

Read-only mode

Now for the coolest part.

When a Raspberry Pi gets unplugged, it’s possible for the SD card data to get corrupted. This isn’t likely, but it can happen, particularly if the Pi is running for long stretches and loses power while it’s in the middle of doing something. And if this happens while your Raspberry Pi is in a gallery on the other side of the country… well, that’s bad.

So how can you prevent this? By not allowing it to write to the disk in the first place! This solution is perfect for my project. We’re not saving any data to the disk. We just need our Python script to run and play sounds when buttons are pressed.

Important Note: This is irreversible! it won’t hurt your Raspberry Pi hardware, but it will “freeze” your SD card in time. You won’t be able to make changes to it anymore (without re-imaging the card, that is). So, make sure you do this step last! And back up your SD card before you do it!

Adafruit has made this process very easy. Just download their read-only shell script, and run it. I won’t copy the code here, since I didn’t write it, and the Adafruit page has a lot of other useful info that’s worth reading before you commit to this.

Adafruit’s read-only Raspberry Pi script

After the script runs, your Pi will be frozen in time. I highly recommend this step if your Raspberry Pi needs to run unattended for a long time.

By the way: Shout out to the crazy person at Adafruit who wrote this shell script. Very cool stuff.

Fans and heat sinks

There are a bunch of fans and heat sinks that you can buy to cool your Raspberry Pi down. They are generally pretty cheap, and can help to cool down the Pi a bit. But if your Pi is regularly overheating, simply adding fans and heat sinks probably won’t solve the issue. It’s likely that the Pi is in a place where it’s just too hot, or there’s not enough ventilation. But they won’t hurt, either, so I recommend at least adding some heat sinks.

Thanks for reading! Hope this info is helpful to someone out there!

Tiny Timer – Saving settings across app sessions

Timer apps often seem unnecessarily large and cluttered. I wanted to build one that is simple, and takes up as little space on your desktop as possible. Tiny Timer is finished and in the Windows app store now!
One of Tiny Timer's intro animations

Tiny Timer has a lot of ways to customize sound, functionality, and appearance. On the app’s settings page, you can choose color and sound options, whether or not to show seconds counting down, and much more.
Some of Tiny Timer's settings

With an app like this, it’s crucial to remember users’ preferences, so the app is in the same state the next time they open it. In the Universal Windows Platform (UWP), there are a lot of ways to go about this. I’m going to walk through a simple implementation using the Singleton design pattern.

Note: Before I get into this, I wanted to point out that many developers today prefer using a different method to solve this problem: Inversion Of Control (IOC) containers and Dependency Injection (DI). The Singleton method is considered outdated by some, but I’m going to stick with it for this post. It’s easier to understand and adequate for a simple system like this. If you’re interested in learning more about the differences, here’s a great write up on Singleton method vs. IOC containers and DI.

Now, where were we? Ah yes, Singleton! Normally, when you create a new class, you would create a new instance of it on every new surface in your app. A Singleton pattern, on the other hand, let’s you expose a single instance of a class across the entire app.

Let’s start by creating a new public class. For simplicity’s sake, I’ll just call it “Settings”:

public class Settings
{
   private static Settings current;

   public static Settings Current
   {
      get
      {
         if (current == null)
         current = new Settings();

         return current;
      }

      set
      {
         current = value;
      }
   }
}

Above, we created a static public property that represents a “Current” instance of the class itself. It creates a new instance if there isn’t already one.

In the Settings class, let’s create a public property for a setting, an Initialize method, and a method to try saving our new setting as local app data.


public class Settings
{
   ...
   // we'll use this property to track the chosen sound index
   public int SoundModeIndex { get; set; }

   public void Init()
   {
      TrySetSecondsModeFromSave();
   }

   // a private method to try and get this setting from local save data
   // if it doesn't exist yet, we'll create the save data with a default value

   private void TrySetSoundModeFromSave()
   {
      if (ApplicationData.Current.LocalSettings.Values["soundMode"] != null)
      {
         // set the property to the index from local saved settings
         // under the application data container value "soundMode"

         SoundModeIndex = (int)ApplicationData.Current.LocalSettings.Values["soundMode"];
      }
      else
      {
         // the value is null, so we can assume it hasn't been set up yet
         // we'll set it up now, with a default value of 3

         SoundModeIndex = 3;
         ApplicationData.Current.LocalSettings.Values["soundMode"] = SoundModeIndex;
      }
   }
}

When we assign a value to ApplicationData.Current.LocalSettings.Values["soundMode"], it creates an application data container in the app's local Settings.dat file. When the app is installed on a device, this file can be found at:
C:\Users\\AppData\Local\Packages\<AppID\Settings
It's good to know where this file lives, in case you want to delete it while you're coding/debugging.

Let's add one more public method to the class to save the data to local settings--basically the reverse of our private TrySetSoundModeFromSave() method.

public void SaveSoundMode()
{
   ApplicationData.Current.LocalSettings.Values["soundMode"] = SoundModeIndex;
}

That's pretty much it! Now we can use this class anywhere in the app. We'll need to call our Init method first. It's probably best to do this in App.xaml.cs, in the OnLaunched() method, so that our Settings class always gets initialized when the app launches.

Settings.Current.Init();

Now for the fun part! Let's hook our sound setting up to the UI. On my SettingsPage, I created a XAML ComboBox control called soundModeComboBox. In the page's code-behind, I've gone ahead and set the ComboBox's selected index to the value of my SoundModeIndex property through the Settings Current instance:

soundModeComboBox.SelectedIndex = Settings.Current.SoundModeIndex;

Another Note: It's probably best to use Binding or x:Bind to bind the value of the ComboBox's SelectedItem to a property, but that's another can of works that I'm not going to get into here.

Lastly, we'll save the setting when the value of the ComboBox changes:

private void ComboBox_SelectionChanged(object sender, SelectionChangedEventArgs e)
{
   // set the settings property to the selected value of the ComboBox
   ComboBox box = sender as ComboBox;
   Settings.Current.SoundModeIndex = box.SelectedIndex;

   // call our public Save method through the Current instance
   Settings.Current.SaveSoundMode();
}

Whenever that ComboBox changes, the new value will be immediately saved to the app's local settings data. And the value in our Settings.Current.SoundModeIndex instance will always be up to date, and we can check it from anywhere in the app.

Thanks for reading!

BitSynth – Working with audio in universal Windows 10 apps

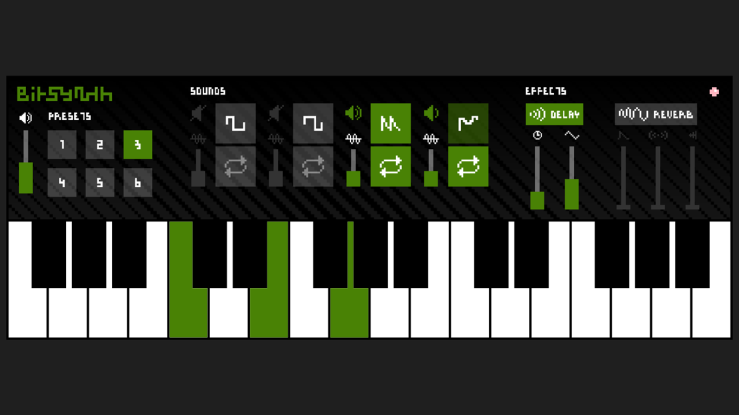
Years back, I built a Windows Phone app called BitSynth. It was programmed in the now-defunct XNA language, and though it still works on Windows 10 mobile devices (the few that exist), it does not work on any other Windows 10 platform, including tablets. More and more Windows 10 devices have touch screens these days, so I decided to rebuild BitSynth from the ground up as a universal Windows app. The new version is in the Store now, and it’s free… check it out!

BitSynth built in UWP for Windows 10

Working with audio in Windows apps can be difficult and convoluted. Here are some of the APIs available:

  • MediaElement – An older, XAML-based implementation for audio or video.
  • MediaPlayerElement – A newer replacement for MediaElement with more flexibility and performance improvements.
  • AudioGraph – An API specifically for generating and playing audio.
  • XAudio2 – A low-level API designed for gaming.

Because BitSynth uses a huge amount of audio samples, AudioGraph is the best way to go. AudioGraph lets you create “input nodes” that exist separately from your sound output. You can have a huge amount of input nodes, and pass them all to one single output node. This separation is what makes something like BitSynth possible. BitSynth needs to load hundreds of audio samples, and have them at the ready whenever a key is pressed. There’s some good documentation out there for using AudioGraph and its various capabilities. In this post, I’m going to talk about creating multiple input nodes and a single output node to play back a simple collection of audio files.

First, create a new public class called SoundPlayer and define three objects:

using System;
using System.Threading.Tasks;
using Windows.Media.Audio;
using Windows.Media.Render;
using Windows.Storage;
using System.Collections.ObjectModel;

public class SoundPlayer
{
   private AudioGraph graph;
   private AudioDeviceOutputNode outputNode;
   private ObservableCollection InputNodes;
}

Next, let’s create a new async Task method that will create an input node from an audio file. Inputs nodes are what we’ll use to pass our audio information to the graph. We need one for each sound that we want to play back. This method will create the input node from a local file (referencing its Uri), add it to the Collection that we defined above, then set it’s outgoing connection to our single output node.

private async Task CreateInputNodeFromFile(string uri)
{
   StorageFile soundFile = await StorageFile.GetFileFromApplicationUriAsync(new Uri(uri));

   CreateAudioFileInputNodeResult fileInputNodeResult =
      await graph.CreateFileInputNodeAsync(soundFile);

   if (AudioFileNodeCreationStatus.Success == fileInputNodeResult.Status)
   {
      fileInputNodeResult.FileInputNode.Stop();
      fileInputNodeResult.FileInputNode.AddOutgoingConnection(outputNode);
      InputNodes.Add(fileInputNodeResult.FileInputNode);
   }
}

Next, let’s create another async Task method where we will initialize our audio player and sound files. To do this, we’ll use multiple input nodes (created with the method above) and a single output node. This code assumes that you have three audio WAV files included in your app project under the path Assets/Sounds/…

public async Task InitializeSounds()
{
   InputNodes = new ObservableCollection();

   AudioGraphSettings settings = new AudioGraphSettings(AudioRenderCategory.Media);
   CreateAudioGraphResult result =
      await AudioGraph.CreateAsync(settings);

   if (result.Status == AudioGraphCreationStatus.Success)
   {
      graph = result.Graph;
      CreateAudioDeviceOutputNodeResult deviceOutputNodeResult =
         await graph.CreateDeviceOutputNodeAsync();

      // make sure the audio output is available
      if (deviceOutputNodeResult.Status == AudioDeviceNodeCreationStatus.Success)
      {
         outputNode = deviceOutputNodeResult.DeviceOutputNode;
         graph.ResetAllNodes();

         // for simplicity's sake I'm creating each input node separately.
         // a better way is to use a separate class and/or collections to define
         // your audio files, then simply loop through them here

         await CreateInputNodeFromFile("ms-appx:///Assets/Sounds/file1.wav");
         await CreateInputNodeFromFile("ms-appx:///Assets/Sounds/file2.wav");
         await CreateInputNodeFromFile("ms-appx:///Assets/Sounds/file3.wav");

         graph.Start();
      }
   }
}

Finally, we need a public Play method to call from elsewhere in the app.

public void PlaySound(int index)
{
InputNodes[index].Reset();
InputNodes[index].Start();
}

That’s pretty much it! Here’s how we initialize the SoundPlayer class and play a sound:

// create an object instance of your class
private SoundPlayer soundPlayer = new SoundPlayer();
// initialize
await soundPlayer.InitializeSounds();

...

//play a sound
soundPlayer.Play(0);

BitSynth’s implementation follows this same pattern, but it’s much more complex since it uses hundreds of samples across multiple sound banks. Here’s my SoundPlayer class on GitHub if you’re interested in checking it out.

Thanks for reading!

Building a Raspberry Pi sound grid

I thought I’d take a break from XAML to talk about one of my favorite subjects: Making things on a Raspberry Pi! I recently had an opportunity to collaborate with a sculptor and friend of mine, Emily Counts, on an interactive sound box.

Apollo, an interactive sound box

Emily works mostly in fired clay. She had an idea to create something like a mystical computer keyboard, with these misshapen buttons that would make strange sounds when pressed.

The more we talked, the more I knew that Raspberry Pi would be a great platform for this project. For a couple reasons:

  1. Most Raspberry Pis have an convenient audio out port (either HDMI or miniplug)
  2. Pygame, a Python library, makes working with audio on a Raspberry Pi really easy

Building the grid
One of the reasons I love working on Raspberry Pi (and Arduino, for that matter) is that it blurs the line between software and hardware development. When you need to solve a problem, you need to think about both. Designing a button grid is a great example. Wiring and coding for a single button is very easy. But what about 16 buttons? Does your software need to listen to 16 separate GPIO pins? Most Arduinos don’t even have that many.

There’s an efficient solution here that uses only 8 GPIO pins.

Raspberry Pi with 8 GPIO pins in use

Imagine the 16 buttons on a 4 by 4 grid, wired together in both rows and columns. If you connect each row and column to a GPIO pin, you can loop through them in a way that lets you figure out which button has pressed.

ButtonIDs = [ [1,2,3,4],
   [5,6,7,8],
   [9,10,11,12],
   [13,14,15,16] ]

# gpio inputs for rows
RowPins = [12,16,20,21]

# gpio outputs for columns
ColumnPins = [17,4,3,2]

...

# define four inputs with pull up resistor
for i in range(len(RowPins)):
   GPIO.setup(RowPins[i], GPIO.IN, pull_up_down = GPIO.PUD_UP)

# define four outputs and set to high
for j in range(len(ColumnPins)):
   GPIO.setup(ColumnPins[j], GPIO.OUT)
   GPIO.output(ColumnPins[j], 1)

...

try:
   while(True):
      for j in range(len(ColumnPins)):
         # set each output pin to low
         GPIO.output(ColumnPins[j],0)
         for i in range(len(RowPins)):
            if GPIO.input(RowPins[i]) == 0:
               ActivateButton(i,j)
               while(GPIO.input(RowPins[i]) == 0):
                  pass
         # return each output pin to high
         GPIO.output(ColumnPins[j],1)

   except KeyboardInterrupt:
      EndScript()

This is such a cool solution! The four row pins are set up as inputs (with pull up resistors), and the four column pins are outputs. We loop through both sets to determine which button is pressed. It’s more efficient than dealing with each button separately, and it’s also flexible. Need 20 buttons? Just wire them together as a 5 by 5 grid.

Here’s a detailed video tutorial that I found helpful in understanding how and why this method works:
Raspberry Pi 4 by 4 grid tutorial video

I also included some resistors between the four input pins, just in case. Here’s what my final wiring looks like:

Wiring inside the sound box

Making noise
For the technology inside the box to feel invisible, I knew right away that my code would need to support polyphony (multiple sounds at once). When a button is pressed, a sound should always play. And when subsequent buttons are pressed, it shouldn’t override anything that’s currently playing. When dealing with sound on a Raspberry Pi, this can be somewhat difficult. But the Pygame library has concept of audio “channels” that makes it quite easy.

First, let’s use Pygame initialize the mixer and set the number of sound channels we want to support. This will allow us to use a different channel when one is busy. Pygame supports up to 16 channels, but for a project like this, that’s too many. My samples are 3 seconds long, and I want to limit the number of sounds that can play at one time. After some experimentation, 6 channels seemed about right.

import pygame.mixer

pygame.mixer.init(48000, -16, 1, 1024)
pygame.mixer.set_num_channels(6)

Next, I’ll write a function to play sound on an available channel.

def PlaySound(sound):
   # get next available sound channel
   # True arg override returns longest running
   # sound channel when none are available
   nextAvailableChannel = pygame.mixer.find_channel(True)

   if nextAvailableChannel != None and nextAvailableChannel.get_busy() == False:
      nextAvailableChannel.play(sound)

My PlaySound() function takes a “sound” object argument, which can be created in Pygame using a file path, like this:

soundOne = pygame.mixer.Sound("soundfiles/01.wav")

In the function, I use Pygame to find the next available channel and play the sound. This way, it doesn’t matter which button is pressed. The sound will be played on another channel if one is available. Adding a “True” argument to find_channel() tells Pygame to return the channel that’s been running the longest if none are available, in the case where you’ve reached your channel limit. This is a really cool feature. It essentially ensures that sound will always play when a button is pressed.

Fool-proofing the Pi
While coding and debugging, my Raspberry Pi is connected to a monitor, with a mouse, keyboard, and Wi-Fi adapter. But when this project is finished, it needs to function independently without any of these. Raspberry Pis are pretty cool in this regard. They are designed to be both complete computers and standalone micro controllers. To turn on a Raspberry Pi, you just plug it in. To turn it off you can just unplug it (though it’s probably safer to shut the OS down properly before doing so).

When my Raspberry Pi gets powered on, I need a script that will run immediately. Thankfully, this is pretty easy to do in Linux. You can use crontab, then create a shell script that finds your Python script and runs it. There are a lot of tutorials out there on how to do this.

With my python script running as soon as the OS boots, all I need to do is power up the Raspberry Pi and the box works immediately. But what about turning it off? Can I just unplug it? I could, but this project will be running all day in a gallery. I didn’t want to take any chances, so I built in a hidden “shutdown” button within my main Python script that safely shuts the Pi down.

import os

# gpio input for shutdown button pin
ShutdownPin = 26

# listen for shutdown button
shutdownInputValue = GPIO.input(ShutdownPin)
if (shutdownInputValue == False):
   ShutdownSystem()

def ShutdownSystem():
   # slowly stop pygame operations and shutdown the Pi
   sleep(1)
   pygame.mixer.stop()
   sleep(.5)
   pygame.mixer.quit()
   sleep(1)
   os.system('shutdown now -h')

Now, when someone presses my shutdown button, it will stop any sounds that are playing, quit the Pygame mixer, and shut down the OS. It would have probably been fine to just unplug the Pi, but this way I’ll be able to sleep a little better at night.

Sound design
For the final product to be beautiful, it needs to sound beautiful. To achieve that, Emily and I collaborated with modular synth musician Matt Kenall.

Matt making noise on a modular synth

We spent a few hours recording noises, and finding just the right sound for each button. This process was a ton of fun, and I’m super proud of the final result.

The final piece is called Apollo, and it’s on display until April 6 at Nationale in Portland.

You can see my final code on GitHub.

Writing C++ code in a C# app

One of the cool things about building apps in the Windows Runtime is that a lot of different languages are supported. When you create a universal app in Visual Studio 2015, you can choose between C#, Visual Basic, JavaScript, or C++. These will each create very different starting projects. And while you can’t just switch between languages within a project, it’s sometimes possible to reference one project from another.

Recently, I needed to include some C++ code in an existing C# app. I had a hard time finding info on how to do this, so I thought it might make a good blog post.

Let’s start by creating a blank C# universal app project.

Creating a new C# project

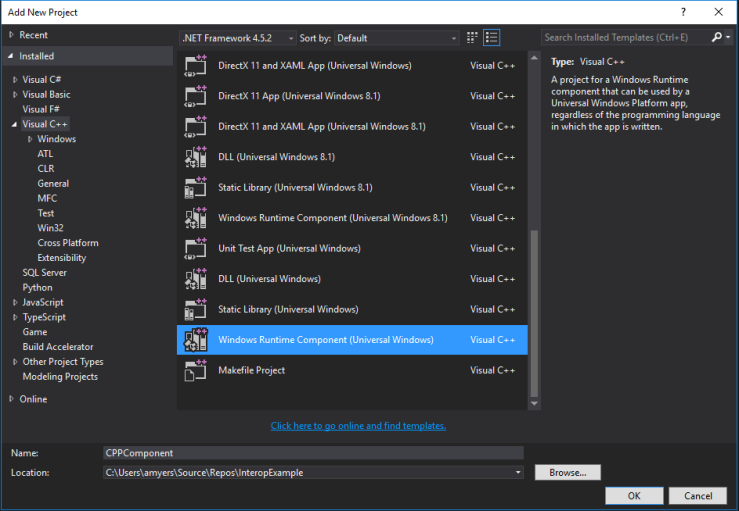
Then, within the same solution, we’ll create a C++ Windows Runtime component. Right-click on the Solution, then go to Add > New Project:

Creating a new C++ component

Choose Visual C++ > Windows Runtime Component:

Creating a new C++ component

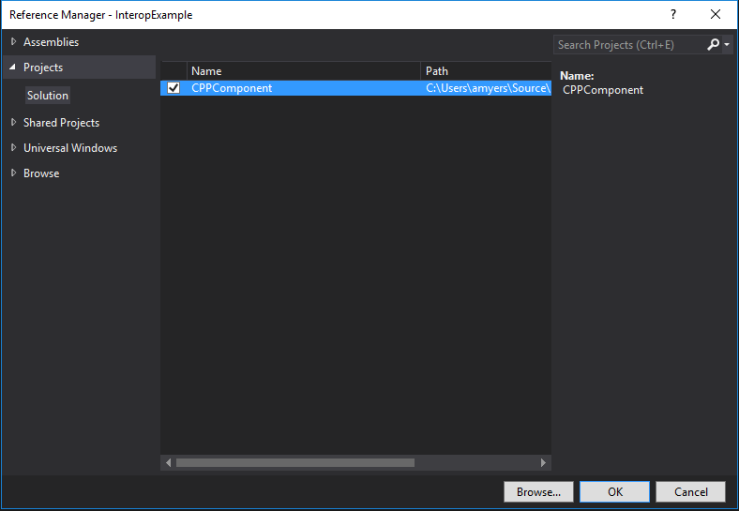
Now we have a C# project and a C++ project in the same solution. But we still need to reference one from the other before they can talk to each other. In the C# project, right-click References and click Add Reference:

Adding a reference in the C# project

Under Projects > Solution, check the box for the C++ component.

Adding a reference in the C# project

Before you can actually call the C++ component in your C# code, you need to build the solution. Press Ctrl+Shift+B to do so.

That’s really all there is to it. Now you can create instances of a class from the C++ component in your C# project. To illustrate, let’s try getting a random number between 1 and 100 using C++, then passing that to our C# code. In a C++ class (you can use the default Class1.cpp), add the following function:

#include "pch.h"
#include "Class1.h"
#include "stdlib.h"

using namespace CPPComponent;
using namespace Platform;

Class1::Class1()
{
}

int Class1::GetRandomNumber()
{
   return rand() % 100 + 1;
}

You’ll also need to declare this function in the Class1.h file:

#pragma once

namespace CPPComponent
{
   public ref class Class1 sealed
   {
   public:
      Class1();
      int GetRandomNumber();
   };
}

With that in place, you can reference your component in your C# code, and add an instance of your C++ class. Let’s do that in MainPage.xaml.cs. Add a using statement for your C++ component, then try creating an instance of Class1 and calling the GetRandomNumber() function:

using Windows.UI.Xaml.Controls;
using CPPComponent;
using System;

namespace InteropExample
{
   public sealed partial class MainPage : Page
   {
      Class1 class1;

      public MainPage()
      {
         this.InitializeComponent();
         class1 = new Class1();

         textBlock.Text = class1.GetRandomNumber().ToString();
      }
   }
}

Getting a random int is an easy example, but most of the time, the data you get from C++ won’t be terribly usable within C#. In this next example, we get the current time from C++. In Class1.cpp, let’s add the following:

#include "time.h"

int Class1::GetTime()
{
   time_t timer;
   return time(&timer);
}

This will get the current time as an int represented in the number of seconds that passed since the default Unix time stamp in 1970. Luckily, C# has an API that can convert this format to something more readable:

namespace InteropExample
{
   public sealed partial class MainPage : Page
   {
   …

      DateTimeOffset dateAndTime;

      …

      private string ConvertTime(int unixTime)
      {
         dateAndTime = DateTimeOffset.FromUnixTimeSeconds(unixTime);
         return dateAndTime.ToString();
      }
   }
}

When we call this method, we can pass in the value from the C++ component and get back a readable DateTimeOffset object in C#.

textBlock.Text = ConvertTime(cppClass.GetTime());

Here’s the app UI built out in XAML, where the button click gets a random number and the current time. You can see the full code on GitHub.

The data showing in XAML UI

Building a Mahjong app, Part 9: The finish line

This will be the final post in my series about building a Mahjong app on the Universal Windows App. To start at the beginning, see Building a Mahjong app, Part 1: Overview.

It’s time to wrap this project up and publish it to the app store. But first, I need to make sure everything works!

Fighting the small screen

A universal app on desktop and mobile

If you’ve built and tested a universal app exclusively on a desktop machine, it can be a bit of a rude awakening the first time you run it on a phone. Things are just different on Windows 10 Mobile. Even common controls tend to behave differently between mobile and desktop. At the very least, there will be some tweaking you’ll need to do. At most, you’ll need to rewrite a lot of UI.

There are different ways to make mobile work in a universal app. One way is to create an alternate XAML file for mobile. This is surprisingly easy. Just create a new, blank XAML file with no code behind, put it in the same directory as your main XAML file, and give it the same name but with the .DeviceFamily-Mobile qualifier at the end of the filename (but before the .xaml). This qualifier tells your app to build this XAML for Windows 10 Mobile using the shared code behind. Pretty handy.

Some would argue that the right way to solve this problem is to make your XAML pages fully responsive. This was the approach I took, but honestly, if I had to do it again, I’d probably just create separate XAML files. If you decide to go down this road, you’ll find RelativePanels and AdaptiveTriggers to be the most important tools in your toolbox. Used in tandem, these two XAML objects can achieve just about any responsive behavior you’d like.

Here’s a simple example of a VisualState that uses an AdaptiveTrigger to change a RelativePanel, based on the app’s width:


<VisualState x:Name="Medium">
    <VisualState.StateTriggers>
        <AdaptiveTrigger MinWindowWidth="560" />
    </VisualState.StateTriggers>
    <VisualState.Setters>
        <Setter Target="roundSummaryGrid.(RelativePanel.Below)" Value="scoresContainerGrid" />
        <Setter Target="roundSummaryGrid.(RelativePanel.AlignHorizontalCenterWith)" Value="scoresContainerGrid" />
    </VisualState.Setters>
</VisualState>

Real-world testing
It’s important to test in as real an environment as possible. For this project, that meant playing a ton of Mahjong and following along with the app. I found A LOT of bugs this way. Many situations I would have never thought of came up in real games. Sometimes they were minor bugs with quick fixes. Other times, they were major oversights that required me to rip apart some portion of the app in order to find a fix. It could be frustrating, but really it’s part of the process.

I also experimented with unit testing. Here’s a unit test method where I go through every round in every game in every save file, and check to see that the players’ round scores add up properly:


[TestMethod]
public void TestRoundScoreValues()
{
    // a method that gets all saved games and puts them in a List
    GetSavedGamesAsync();

    foreach (Game game in SavedGamesList)
    {
        for (int i = 0; i < game.Players[0].RoundScores.Count; i++)
        {
            int p1Score = game.Players[0].RoundScores[i];
            int p2Score = game.Players[1].RoundScores[i];
            int p3Score = game.Players[2].RoundScores[i];
            int p4Score = game.Players[3].RoundScores[i];

            Assert.AreEqual(p1Score + p2Score + p3Score + p4Score, 0);
        }
    }
}

This gets each player’s score for each round, and makes sure they add up to 0. If they do, the test passes. If they don’t, it fails.

End game
Even though the process of submitting an app is fairly easy, this can be the most difficult part. You grow attached to your project, and it’s hard to know when to stop working on it. In software development, there will always be a better way: More features, more fixes, more refactoring… If that weren’t true, things would be perfect already and we’d all be out of the job.

Things may never feel finished, but you still need to find the right time to stop. I think this process takes a different form for every developer. For me, it’s finding a balance between planning and experimentation. I need to have the flexibility to noodle around, and over-planning feel like a hindrance. That said, I also need to work towards a goal. I wouldn’t use the phrase “good enough”–anything you put your name on should be great–but you have to stop some time.

For this project to be release-worthy, it had to meet three criteria:

  1. Meets all three of my original goals
  2. Looks great across devices
  3. No major bugs

Once I felt I’d reached this point, it was time to submit it to the Store. Check it out!

https://www.microsoft.com/store/apps/9nblggh5q7mq

The nice thing about finishing an app is that it’s never actually done. You can stop working on it if you want, but you can always pick up again where you left off. Updating and republishing an app package is super easy. Even though my app is now published, I have a back log of all the things I wasn’t able to get to. I still intend to rewrite a lot of the Learn To Play section, and add some new features (including a Live Tile for when the app gets pinned to Start).

I hope you enjoyed this series. On to the next project!

Building a Mahjong App, Part 8: Saving and loading app data

This is part 8 of a series about building a Windows 10 universal app. For part 1, see Building a Mahjong app, Part 1: Overview.

When I started building Mahjong Aid, I had 3 goals:

  • Make Mahjong games easier by calculating game scores
  • Reliably keep track of ongoing Mahjong games
  • Teach people how to play Mahjong

That second bullet point was going to be the trickiest. I’d never dabbled in saving app data, aside from some simple local settings. I would need to learn how to save all the appropriate game data, and load it on demand when the user needs it.

Saved games UI

Luckily, UWP apps make it pretty easy. In fact, being a universal app means you can save a user’s app data in a way that it can be accessed from any Windows 10 device, including a phone. There are a few tricks to getting it working just right, though. If you’re new to this subject like I was, I suggest searching the web and reading some of the documentation on local and roaming app data, as well as serializing JSON or XML in C#.

I decided to use JSON over XML, mostly because I’d read on a blog that JSON takes up less space. Since I wanted my app data to be “roaming” (meaning it is saved in the cloud associated with the user’s Microsoft account), smaller seemed better. I also find JSON to be a lot more readable than XML.

Serializing data and opening up a stream to read or write the data is actually pretty easy. Here’s a simple method in my app for writing saved games to data:


private async Task WriteSavedGamesAsync()
{
   DataContractJsonSerializer serializer = new DataContractJsonSerializer(typeof(List<Game>));

   using (Stream stream = await ApplicationData.Current.RoamingFolder.OpenStreamForWriteAsync("mahjong-data.json", CreationCollisionOption.ReplaceExisting))
   {
      // pass game list into the serializer
      serializer.WriteObject(stream, MasterSavedGamesList);
   }
}

The data gets written to a file in your app’s RoamingState folder called "mahjong-data.json". If that file name already exists, CreationCollisionOption.ReplaceExisting tells the app to overwrite it. You can get to your RoamingState folder in the File Explorer at the following location:
C:\Users\[YourUserName]\AppData\Local\Packages\[YourAppsID]\RoamingState

The hardest part for me was figuring out what to include in the data, and when to read and write it. I'll focus on those two things for the rest of this post.

What should I include in the data?
You’ll need to choose something to pass into the serializer to write to your app data. In Mahjong Aid, I have a class called Game that contains properties for everything I need to know about a given game. I even pass an instance of Game from page to page as the user navigates through the app. But ultimately, this app needs to be able to deal with multiple games, not just one. The user needs to be able to start many games, save them, and load them whenever they want. So, I decided to use a master List of Game objects as my data.

List<Game> MasterSavedGamesList;

An instance of this List gets created whenever we’re in a UI that might need to get the saved data and do something with it. Here’s how we read the data and store it in the List:

// create new instance of saved games list
MasterSavedGamesList = new List<Game>();

DataContractJsonSerializer serializer = new DataContractJsonSerializer(typeof(List<Game>));

Stream stream = await ApplicationData.Current.RoamingFolder.OpenStreamForReadAsync("mahjong-data.json");

// deserialize game data, cast to List of type Game, and assign it to our saved games List
MasterSavedGamesList = (List<Game>)serializer.ReadObject(stream);

Not too different from the previous code, but notice that we’re using OpenStreamForReadAsync() and serializer.ReadObject() methods, as opposed to their counterparts for writing data.

Now we have a master list that we can modify however we need to, as long as we write it back to the app data when we’re done.

When should I read and write it?
I will admit, I struggled with this part. First off, I didn’t want the user to have to explicitly click a Save button. The app should be smart enough to “auto-save” the data on its own. Second, the logic was slightly different depending on whether the user already had save data or not. I needed to find the right place in the app to write a new game to the save data OR initialize the save data on first run. I chose to do that when the user clicks the button to start a new game.

Button for starting a new game

At this point, we have all the necessary Game data, and the user has committed by clicking the button.

Here’s some of the code that gets run on the button’s Click event handler. I’ve added //comments throughout to explain what’s going on:


private async void StartGameButton_Click(object sender, RoutedEventArgs e)
{
   //First, we hide the button so the user can't click it again...
   startGameButton.Visibility = Visibility.Collapsed;
   //...and we show some progress UI in its place
   startGameProgress.Visibility = Visibility.Visible;

   //Here we set a bunch of Game properties. I've omitted this part.
   ...

   //Next, we try to run a method that saves the game data.
   try
   {
      await SaveNewGameAsync();
   }
   catch
   {
      //If that fails, we know there isn't anything there. So, we initialize new save data instead.
      await InitializeSaveDataAsync();
   }

   //Lastly, we navigate to the Game Results page.
   Frame.Navigate(typeof(GameResultsPage), game);
}

The two methods referenced above are slightly different. SaveNewGameAsync() reads then writes the data, while InitializeSaveDataAsync() only writes it. I’ll show both:


private async Task SaveNewGameAsync()
{
   // create new instance of saved games list
   SavedGamesList = new List<Game>();

   // read saved games list from Json data
   DataContractJsonSerializer serializer = new DataContractJsonSerializer(typeof(List<Game>));

   var stream = await ApplicationData.Current.RoamingFolder.OpenStreamForReadAsync("mahjong-data.json");

   // retrieve the list of game objects add assign to our new List
   SavedGamesList = (List<Game>)serializer.ReadObject(stream);

   // add new game to the saved games list
   SavedGamesList.Add(game);

   // write saved games list back to storage
   using (stream = await ApplicationData.Current.RoamingFolder.OpenStreamForWriteAsync("mahjong-data.json", CreationCollisionOption.ReplaceExisting))
   {
      // pass game list into the serializer
      serializer.WriteObject(stream, SavedGamesList);
   }
}

private async Task InitializeSaveDataAsync()
{
   SavedGamesList = new List<Game>();
   SavedGamesList.Add(game);
   DataContractJsonSerializer serializer = new DataContractJsonSerializer?(typeof(List<Game>));

   using (Stream stream = await ApplicationData.Current.RoamingFolder.OpenStreamForWriteAsync("mahjong-data.json", CreationCollisionOption.ReplaceExisting))
   {
      // pass game list into the serializer
      serializer.WriteObject(stream, SavedGamesList);
   }
}

The full code for this page can be seen on GitHub, here.

Once I had this code in place, the rest was pretty easy. Each page of the app required its own, slightly different methods for reading and writing data, depending on the context.

Building a Mahjong app, Part 7: A funky loop

Sometimes, going through a loop normally just doesn’t cut it. That’s why statements like break and continue exist: To change a loop’s normal behavior. Another loop-defying statement (one I had never used until recently) is goto. Unlike it’s brethren, goto lets you decide where to go when you break out of a loop (or a switch statement) unnaturally.

In my Mahjong app, I found a nice home for goto in a particularly needy foreach loop. Here’s the problem I needed to solve:

In my Sets UI, if someone checks the “Terminals or honors” check box, I need to know a bit more about that set. For now, I decided to use radio buttons that are only visible when you check the box.

Terminals or honors check box

A user can have multiple “Terminals or honors” sets, and therefore multiple groups of radio buttons will appear. And in one particular case, I need to show three radio buttons as opposed to the default two. The optional third radio button is for a “Double lucky” set, which is only possible when the round winner’s lucky wind is the same as the round’s prevailing wind (something I can always tell programmatically).

Multiple Terminals or honors check boxes selected

While it’s possible to have many “lucky” sets, it’s only possible to have one “double lucky” set per round. So, back to the problem at hand: I need to be able to disable any the additional “double lucky” radio buttons if one of them has already been selected.

Disabled double Lucky check boxes

Here’s how I did it.

First, I create a list of all the “double lucky” RadioButtons from two existing lists:

List<RadioButton> AllDoubleLuckyRadioButtons = new List<RadioButton>();
AllDoubleLuckyRadioButtons.AddRange(PungDoubleLuckyRadioButtons);
AllDoubleLuckyRadioButtons.AddRange(KongDoubleLuckyRadioButtons);

Now that we have a clean list of all the radio buttons we may need to touch, here’s the loop to iterate through them. Notice the restart label. This will be referenced multiple times by the goto statement.

// variables to store the name of any checked item, plus first and second run through the loop
string checkedName = "";
bool firstRun = true;
bool secondRun = false;

restart:
foreach (RadioButton radioButton in AllDoubleLuckyRadioButtons)
{
   // first run, we enable all double lucky radio buttons
   if (firstRun == true &&
AllDoubleLuckyRadioButtons.IndexOf(radioButton) == AllDoubleLuckyRadioButtons.Count - 1)
   {
      radioButton.IsEnabled = true;

      // on the last time through the first run, restart the loop
      firstRun = false;
      secondRun = true;
      goto restart;
   }
   else
   {
      radioButton.IsEnabled = true;
   }

   // second run, look for any checked double lucky radio buttons
   if (radioButton.IsChecked == true && secondRun == true)
   {
      // if we find one, store its name
      checkedName = radioButton.Name;

      // then restart the loop
      secondRun = false;
      goto restart;
   }

   // third run, disable all double lucky radio buttons except the checked one
   if (firstRun == false && secondRun == false && radioButton.Name != checkedName)
   {
      radioButton.IsEnabled = false;
   }
}

The same foreach loop will be executed three times. Here’s what happens on each run:

  1. 1st run: We enable every “double lucky” radio button, since there might be some that were previously disabled. Then we set bool firstRun and bool secondRun and restart the loop.
  2. 2nd run:The second time through, we look for any selected “double lucky” radio buttons. If we find one, we store it’s name in checkedName, then immediately set bool secondRun and restart the loop. (There’s no reason to keep going, as we can only ever have one selected “double lucky” radio button.)
  3. 3rd run:The third time through, we disable all “double lucky” radio buttons except the checked one.

We run this code in the Checked and Unchecked events for both the radio buttons and the check boxes. That way, were rechecking whether radio buttons should be enabled or disabled on every selection change.

Building a Mahjong app, Part 6: Further refactoring

As I continue to refactor my Mahjong app, one of the most important tools at my disposal has been the value-returning method. When used in the right way, methods that return a value (as opposed to void methods, which do not return a value) can make your code a ton cleaner, and more reusable.

Here’s a snippet from my SetPlayerScore() method, where I take two parameters—an instance of Player, and an int baseScore—and using these to calculate the round score for each player.


private void SetPlayerScore(Player player)
{
   if (DealerWon()) // dealer won so score is multiplied 6x
   {
      if (player == RoundWinner()) // AWARD THE WINNER
      {
         player.RoundScores.Add(baseScore * ScoreValues.X_ISWINNER_ISDEALER); // x6, positive
         // add to round summary
         game.CurrentRoundSummary.Insert(game.CurrentRoundSummary.Length, RoundWinner().Name +
            " won this round! Since they were also the dealer, they receive " +
            (finalBaseScore * ScoreValues.X_ISWINNER_ISDEALER) +
            ": The base score of " +
            finalBaseScore +
            " multiplied by 6.");
      }
      else // TAKE FROM LOSERS
      {
      ...

This method goes on for a while, but each conditional follows the same pattern: It multiplies the base score by a score value, and adds the new value to the RoundScores list for that player. My general scoring logic here is sound. But there are two things I’m doing that I probably shouldn’t be:

  1. I’m adding text to the round summary in this method. This is different functionality, and should really be abstracted from the actual calculating of the score.
  2. I’m setting the final score in this method. This works fine, but it turns this method into a one trick pony because I can really only call it once. What if I wanted to calculate a player’s round score before I commit to it? If I simply use a return method here, this method transforms into something much more flexible and reusable.

Here’s the refactored version:

private int PlayerRoundScore(Player player, int baseScore)
{
   if (DealerWon()) // dealer won so score is multiplied 6x
   {
      if (player == RoundWinner()) // AWARD THE WINNER
      {
         return (baseScore * ScoreValues.X_ISWINNER_ISDEALER); // x6, positive
      }
      else // TAKE FROM LOSERS
      {
      ...

I’ve moved the game summary insertion to its own method (not showing that here), and returning the calculated value for the player’s round score rather than setting it. Notice the int replacing void in the method declaration. This tells C# that the method will always return an int value, and changes the context of this method when it gets called.

I’ve also changed the name to PlayerRoundScore(). Now, when I call the method, it safely returns a player’s round score without permanently changing anything. I can now use it in different ways. In this example, I’m using it to show each player’s score live, as the user makes changes (CurrentBaseScore() returns the current base score int, and _inProgressTips is a StringBuilder):


foreach (Player player in game.Players)
{
   _inProgressTips.Insert(_inProgressTips.Length, player.Name +
      ": " +
      PlayerRoundScore(player, CurrentBaseScore()));
}

This is pretty cool. I can now show live updates of each player’s score, as the user makes changes to the scoring UI:

Scoring UI

And when I’m ready to commit the score permanently, I simply do this:


// process the final score for each player
foreach (Player player in game.Players)
{
   // process the score for each player and add it to the player's Round Scores list
   player.RoundScores.Add(PlayerRoundScore(player, _finalBaseScore));

   // set each player's total score
   player.TotalScore += player.RoundScores[game.CurrentRound - 1];
}

Building a Mahjong app, Part 5: The Rules!

Alright, now for the fun stuff.

The scoring system is the heart of my Mahjong app. If it doesn’t work flawlessly, the app is pretty much a bust. Scoring in Mahjong can be complicated, and varies greatly from region to region. I won’t explain the details of how a winning hand is scored, but if you’re interested, Rummy.com has a pretty good rundown of the basics.

In this app, the scoring starts by keeping track of the prevailing wind and round dealer from the beginning. We use that information–along a series of questions we ask the user–to calculate the basic score.

Basic scoring questions

If the scoring system is the heart, then the Rules are the blood that flows through it. In my Data Model, I have a class called Rule. Each instance of a Rule has the potential to affect the score in one of two ways: Either by adding points to the score, or by doubling it. And not all Rules are visible to the user. Some happen completely behind the scenes. Others are always shown in the ListView, for the user to select. And others are only shown in the ListView if certain requirements are met. Here’s the ListView UI:

The scoring page's ListView

All Rule instances get initialized when a Game instance is created, then added to a Rules List for that Game instance. Here’s the “Three Kongs” rule being initialized and added to game.Rules:

game.Rules.Add(threeKongs = new Rule());
threeKongs.ShowInList = false;
threeKongs.Double = 2;
threeKongs.Name = "Three kongs (2 doubles)";
threeKongs.Description = "there are three kongs";

This rule is simple: If the winner has three kongs (sets of 4), their score gets doubled twice. Notice that the ShowInList property is set to false. We never want to show this in the ListView, because we can always detect whether the user has three kongs or not. So we keep it hidden and take care of it behind the scenes.

Here’s another rule called “Off the dead wall”:

game.Rules.Add(offTheDeadWall = new Rule());
offTheDeadWall.Double = 1;
offTheDeadWall.Name = "Off the dead wall (double)";
offTheDeadWall.Description = "the winning tile came off the dead wall";

If the winner drew the winning tile from the dead wall, they get one double. We don’t set ShowInList at all here, because we don’t yet know if we want to show it. But we will know after the user selects the number of Kongs. You can only draw from the dead wall after laying down a Kong. So, later in the code, if there’s one or more Kong, we set the ShowInList property to true.

switch (game.Rules.IndexOf(rule))
{
    ...
    case 14:
        if (kongCountComboBox.SelectedIndex > 0)
            rule.ShowInList = true;
        else
            rule.ShowInList = false;
        break;
    ...
}

As you can see, this is part of a bigger Switch statement with lots of cases. This particular switch statement checks rules that are sometimes shown, and sets their ShowInList property. It’s long, so I won’t show it all here. But I do want to show the method that it lives in:

private void InitializeRules()
{
    // set up list of possible rules
    PossibleRules = new List<Rule>();

    foreach (Rule rule in game.Rules)
    {
        // the Switch statement goes here
    };

    // add all eligible rules to the list
    if (rule.ShowInList == true)
        PossibleRules.Add(rule);

    // set the item source of the ListView
    rulesListView.ItemsSource = PossibleRules;
}

This is pretty cool, actually. We can run this method anytime something changes that might have an effect on the ListView. For example, if the user selects 1 Kong from the dropdown list, we run InitializeRules() on the SelectionChanged event for that dropdown, and boom: The “Off the Dead Wall” option appears in the ListView.

Here’s one more Rule called “One Chance”:

game.Rules.Add(oneChance = new Rule());
oneChance.ShowInList = true;
oneChance.Double = 0;
oneChance.Score = ScoreValues.ONE_CHANCE_SCORE;
oneChance.Name = "One chance (" + oneChance.Score.ToString() + " points)";
oneChance.Description = "it was only possible to win with one tile";

This rule gets applied if the winner’s winning tile had to be one specific tile. We have no way of knowing this, so ShowInList is initialized to true. We always want to show it in the ListView. Also notice that Double is set to 0, but Score has a value. This is a Rule that adds a score value to the winner’s score rather than doubling it.

Now it’s time to update the winner’s score. This has to be done in a few different ways, and in a specific order, but I’ll show you the method where we add to the winner’s score with a value, like the example above. We do this in a method called ApplySelectedRuleValues:

private void ApplySelectedRuleValues()
{
    foreach (Rule rule in rulesListView.SelectedItems)
    {
        if (rule.Score != null) // if a rule is selected and has a Score value
        {
            // add points
            _currentBaseScore += rule.Score.Value;

            // add description to the summary
            AddToSpecialRulesSummary(rule.Score + " is added to the base score because " + rule.Description + ".");
        }
    }
}

This is just one aspect of the scoring system in the app. I’ll talk about processing doubles in the next post, but if you want to see more of the scoring system now, check out the code behind for EnterScoresPage.xaml. That’s where the magic happens 🙂

Thanks! Hope this is helpful to someone.
-Andy